In this exercise, you are going to install an Arduino library, and then use it for capacitive (touch) sensing. First you will create two sensors, and then you will add a buzzer to your Arduino to make a tiny piano.
0. If you have the Arduino IDE open, close it.
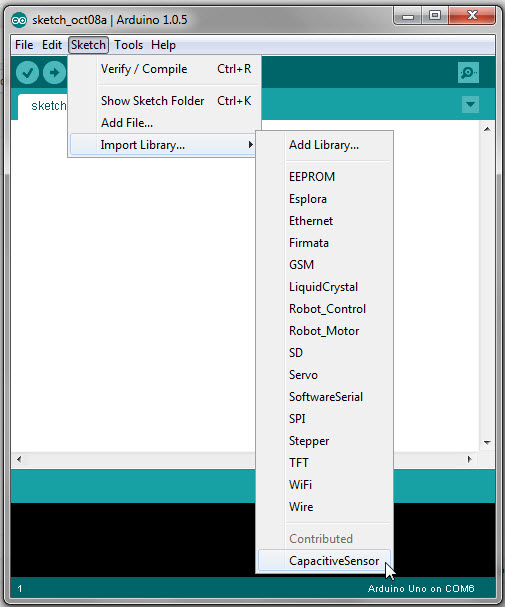
1. Download the CapSense Library (called CapacitiveSensor04.zip) and save it somewhere that you can find it again. Unzip it. Open up the subfolder called “libraries.”
2. Inside libraries, you will see the CapacitiveSensor folder. Copy this folder into your Arduino Library folder. For me, the Arduino Library folder is located at My Documents > Arduino > Libraries. Yours should be similar.
3. Launch the Arduino IDE. Now you should see the CapacitiveSensor library under your list of available libraries.
4. Take a minute to appreciate that you just installed your first library. There are gazillions of libraries out there. Now you have significantly more coding power than you did before.
5. Now go to File > Examples > CapacitiveSensor > CapacitiveSensorSketch. This is the sketch that you’ll be using.
6. Go back to take a look at the CapacitiveSensing page. Note that you can read about all of the methods that are included in the library, the variables that you need to send them, and the variables that they return. (Side note: methods are a lot like functions — you can use these words interchangeably with most everyone except coding purists.)
7. CapacitiveSensorSketch creates 3 sensors. You are just going to make 2 sensors. Comment out every line that refers to cs_4_2. Also, since cs_4_2 is used to calculated total1, so you should also comment out any line that refers to total1.
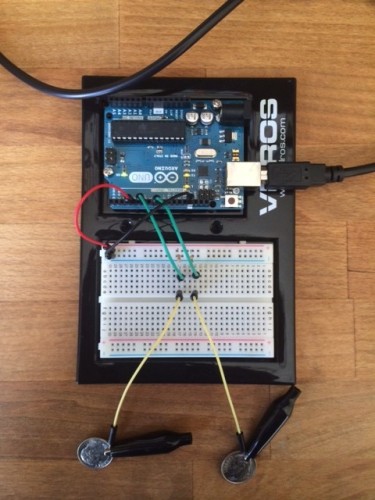
8. Set up your board using pins 4, 6 and 8. Be sure to include a 10K ohm resistor on each sensor. Also, ground your board.
There is no single correct way to do this, but this is how I set it up (the resistors are between the positive rail and the green wires):
9. Upload your CapacitiveSensorSketch. Open the serial monitor. Click on the sensors, see what happens.
10. Try replacing the ends of the sensors (dimes in the example above) with something else that’s more or less conductive. How does it work? Do your values change?
11. Now, think about incorporating an output into your Arduino sketch so you can respond to a sensed touch. How would you make the piezo buzzer sound a single note when the left sensor is pressed?
12. After you have the left sensor worked out, add another note when the right sensor is pressed.
13. Add a third note for when both are pressed at the same time.
14. Manipulate the delay times and the buzz duration so the notes are as smooth as possible.
15. Now you have a tiny piano! Think about how you might add more keys.

